本文采用 DevStack 部署 OpenStack(W版本),包含单节点部署与多节点部署。
[toc]
一、单节点部署 1. 环境准备 1.1 镜像源 sudo vim /etc/apt/sources.list
1
2
3
4
5
6
7
8
deb https://mirrors.tuna.tsinghua.edu.cn/ubuntu/ focal main restricted universe multiverse deb https://mirrors.tuna.tsinghua.edu.cn/ubuntu/ focal-updates main restricted universe multiverse deb https://mirrors.tuna.tsinghua.edu.cn/ubuntu/ focal-backports main restricted universe multiverse deb https://mirrors.tuna.tsinghua.edu.cn/ubuntu/ focal-security main restricted universe multiverse
1.2 pip源 sudo mkdir ~/.pip && sudo vim ~/.pip/pip.conf
1
2
3
4
[global] index-url = https://pypi.tuna.tsinghua.edu.cn/simple [install] trusted-host = pypi.tuna.tsinghua.edu.cn
1.3 安装依赖包 更新并安装依赖包
1
2
3
sudo apt update && sudo apt upgrade sudo apt install bridge-utils git python3-pip sudo pip3 install wheel
2. OpenStack安装 - wallaby 2.1 添加stack用户 1 2 3 4 5 6 7 8 sudo useradd -s /bin/bash -d /opt/stack -m stack echo "stack ALL=(ALL) NOPASSWD: ALL" | sudo tee /etc/sudoers.d/stacksudo su - stack
2.2 设置代理 1 2 3 4 5 export HTTP_PROXY=http://proxy_ip:portexport HTTPS_PROXY=http://proxy_ip:port
2.3 下载devstack,使用-b指定版本 git clone https://opendev.org/openstack/devstack.git -b stable/wallaby
2.4 进入devstack目录,编辑配置文件 cd devstack && vim local.conf
1 2 3 4 5 6 7 8 9 10 11 12 13 14 15 [[local |localrc]] HOST_IP=172.19.204.10 GIT_BASE=http://git.trystack.cn ADMIN_PASSWORD=123 DATABASE_PASSWORD=$ADMIN_PASSWORD RABBIT_PASSWORD=$ADMIN_PASSWORD SERVICE_PASSWORD=$ADMIN_PASSWORD OS_AUTH_URL=http://172.19.204.10:5000/v3 DEST=/opt/stack SCREEN_LOGDIR=$DEST /logs/screen
ADMIN_PASSWORD:OpenStack 用户 admin 和 demo 的密码DATABASE_PASSWORD:MySQL 管理员用户密码RABBIT_PASSWORD:RabbitMQ 密码SERVICE_PASSWORD:服务组件和 KeyStone 交互的密码GIT_BASE:源代码托管服务器HOST_IP:绑定的 IP 地址
2.5 开始安装 1 2 3 4 5 6 7 8 ./stack.sh ./unstack.sh ./clean.sh
2.6 安装完成 1 2 3 4 5 6 7 8 9 10 11 12 13 14 15 16 17 18 19 20 21 22 23 24 25 26 27 28 29 30 31 32 33 34 35 36 ========================= DevStack Component Timing (times are in seconds) ========================= wait_for_service 15 pip_install 118 apt-get 58 run_process 44 dbsync 23 apt-get-update 6 test_with_retry 2 async_wait 0 osc 170 ------------------------- Unaccounted time 646 ========================= Total runtime 1082 This is your host IP address: 172.19 .204 .10 This is your host IPv6 address: fc00:5 a24:1958 :1 :5 ea7:21f f:fe3c:17 c4 Horizon is now available at http: Keystone is serving at http: The default users are: admin and demo The password: 123 Services are running under systemd unit files. For more information see: https: DevStack Version: wallaby Change: ea636e0a92670353ac48274e704d30662f722691 Write safe.directory items to system git config 2022 -04 -18 21 :31 :09 -0500 OS Version: Ubuntu 20.04 focal 2022 -04 -21 15 :05 :10.495 | stack.sh completed in 1083 seconds.
二、多节点部署 ubuntu20.04 LTS安装OpenStack Wallaby版本。一个controller节点,两个compute节点。
1. 环境准备
【环境准备】部分的所有操作均需要在各节点 执行。
1.1 换源、依赖安装 1.1.1 镜像源 sudo vim /etc/apt/sources.list
1 2 3 4 5 6 7 8 deb https://mirrors.tuna.tsinghua.edu.cn/ubuntu/ focal main restricted universe multiverse deb https://mirrors.tuna.tsinghua.edu.cn/ubuntu/ focal-updates main restricted universe multiverse deb https://mirrors.tuna.tsinghua.edu.cn/ubuntu/ focal-backports main restricted universe multiverse deb https://mirrors.tuna.tsinghua.edu.cn/ubuntu/ focal-security main restricted universe multiverse
更新软件包:sudo apt update && sudo apt upgrade
1.1.2 pip源 sudo mkdir ~/.pip && sudo vim ~/.pip/pip.conf
1 2 3 4 [global] index-url = https://pypi.tuna.tsinghua.edu.cn/simple [install] trusted-host = pypi.tuna.tsinghua.edu.cn
1.1.3 安装部分依赖包 有的依赖包不安装后面可能会出错,因此先手动安装
1 2 sudo apt install bridge-utils git python3-pip sudo pip3 install wheel
1.2 添加stack用户 添加用户stack,并设置为无密码可执行sudo命令。
1 2 3 4 5 6 7 8 9 10 11 sudo useradd -s /bin/bash -d /opt/stack -m stack echo "stack ALL=(ALL) NOPASSWD: ALL" | sudo tee /etc/sudoers.d/stacksudo su - stack sudo passwd stack
1.3 设置代理 通过export设置的代理仅在当前终端下有效,重新打开终端后也需重新设置。
1 2 3 4 5 export HTTP_PROXY=http://proxy_ip:portexport HTTPS_PROXY=http://proxy_ip:port
1.4 设置免密登录 1.4.1 修改hosts文件 修改hosts文件,并添加各节点的ip地址:vim /etc/hosts
1 2 3 172.19.204.30 h3c-node01 compute2 172.19.204.20 h3c-node02 compute1 172.19.204.10 h3c-node03 controller
1.4.2 配置免密登录 1 2 3 4 5 6 7 8 9 10 11 12 ssh-keygen ssh-copy-id stack@controller ssh-copy-id stack@compute1 ssh-copy-id stack@compute2 ssh stack@controller ssh stack@compute1 ssh stack@compute2
1.5 下载devstack安装库 通过-b指定版本。
git clone https://opendev.org/openstack/devstack.git -b stable/wallaby
2. 安装 先安装好controller,再安装computer节点。默认安装路径在/opt/stack
2.1 controller节点 2.1.1 修改devstack的配置文件 1. 创建local.conf文件 在下载的git仓库devstack目录下创建配置文件local.conf。
1 2 3 4 5 6 7 8 9 10 11 12 13 14 15 16 17 18 19 [[local |localrc]] HOST_IP=172.19.204.10 GIT_BASE=http://git.trystack.cn OS_AUTH_URL=http://172.19.204.10:5000/v3 MULTI_HOST=1 LOGFILE=/opt/stack/logs/stack.sh.log DEST=/opt/stack ADMIN_PASSWORD=123 DATABASE_PASSWORD=$ADMIN_PASSWORD RABBIT_PASSWORD=$ADMIN_PASSWORD SERVICE_PASSWORD=$ADMIN_PASSWORD
2.2 computer节点 在下载的git仓库devstack目录下创建配置文件local.conf。
2.2.1 computer1节点 1 2 3 4 5 6 7 8 9 10 11 12 13 14 15 16 17 18 19 20 21 22 23 24 25 [[local |localrc]] HOST_IP=172.19.204.20 GIT_BASE=http://git.trystack.cn OS_AUTH_URL=http://172.19.204.10:5000/v3 MULTI_HOST=1 LOGFILE=/opt/stack/logs/stack.sh.log DEST=/opt/stack ADMIN_PASSWORD=123 DATABASE_PASSWORD=$ADMIN_PASSWORD RABBIT_PASSWORD=$ADMIN_PASSWORD SERVICE_PASSWORD=$ADMIN_PASSWORD DATABASE_TYPE=mysql SERVICE_HOST=172.19.204.10 MYSQL_HOST=$SERVICE_HOST RABBIT_HOST=$SERVICE_HOST GLANCE_HOSTPORT=$SERVICE_HOST :9292 ENABLED_SERVICES=n-cpu,c-vol,placement-client,ovn-controller,ovs-vswitchd,ovsdb-server,q-ovn-metadata-agent NOVA_VNC_ENABLED=True NOVNCPROXY_URL="http://$SERVICE_HOST :6080/vnc_auto.html" VNCSERVER_LISTEN=$HOST_IP VNCSERVER_PROXYCLIENT_ADDRESS=$VNCSERVER_LISTEN
2.2.2 computer2节点 1 2 3 4 5 6 7 8 9 10 11 12 13 14 15 16 17 18 19 20 21 22 23 24 25 [[local |localrc]] HOST_IP=172.19.204.30 GIT_BASE=http://git.trystack.cn OS_AUTH_URL=http://172.19.204.10:5000/v3 MULTI_HOST=1 LOGFILE=/opt/stack/logs/stack.sh.log DEST=/opt/stack ADMIN_PASSWORD=123 DATABASE_PASSWORD=$ADMIN_PASSWORD RABBIT_PASSWORD=$ADMIN_PASSWORD SERVICE_PASSWORD=$ADMIN_PASSWORD DATABASE_TYPE=mysql SERVICE_HOST=172.19.204.10 MYSQL_HOST=$SERVICE_HOST RABBIT_HOST=$SERVICE_HOST GLANCE_HOSTPORT=$SERVICE_HOST :9292 ENABLED_SERVICES=n-cpu,c-vol,q-agt,placement-client,ovn-controller,ovs-vswitchd,ovsdb-server,q-ovn-metadata-agent NOVA_VNC_ENABLED=True NOVNCPROXY_URL="http://$SERVICE_HOST :6080/vnc_auto.html" VNCSERVER_LISTEN=$HOST_IP VNCSERVER_PROXYCLIENT_ADDRESS=$VNCSERVER_LISTEN
2.3 修改配置
各节点均需要执行
2.3.1 nova.conf 避免出现 [错误: Build of instance 6ec6e8b1-9300-4be4-95fe-20434ea041f5 aborted: Volume e3dcad3d-dd22-4947-99d8-b8d0ad4b1025 did not finish being created even after we waited 187 seconds or 61 attempts. And its status is error.]问题。
修改nova.conf,添加以下参数设置。
1 2 3 4 5 6 7 8 [root@cinder ~] block_device_allocate_retries=600 block_device_allocate_retries_interval=5 block_device_creation_timeout=600 [root@cinder ~]
2.3.2 修改卷组位置 修改OpenStack创建虚拟机时分配磁盘的位置。
查看/etc/cinder/cinder.conf,搜索volume_group对应的值,默认为stack-volumes-lvmdriver-1
输入命令vgs查看当前vg,删除不需要的vg, vgremove ****
1 2 3 4 5 6 7 stack@controller:/$ sudo vgs VG stack-volumes-default 1 0 0 wz--n- <30.00g <30.00g stack-volumes-lvmdriver-1 1 1 0 wz--n- <30.00g 1.43g vgubuntu 1 2 0 wz--n- 1.09t 0 stack@controller:/$ sudo vgremove stack-volumes-lvmdriver-1
在对应的磁盘上创建vg
1 2 sudo pvcreate /dev/sdc sudo vgcreate stack-volumes-lvmdriver-1 /dev/sdc
重启服务,sudo systemctl restart devstack@*
2.4 上传镜像
修改镜像格式(qcow2转raw)
qemu-img convert -f qcow2 win7.qcow2 -O raw win7.raw
1 openstack image create "ubuntu20-server" --file ubuntu20-server.qcow2 --disk-format qcow2 --container-format bare --public
2.5 在指定compute节点创建实例
查看可用zone:openstack availability zone list
查看可用host:openstack host list
查看可用node:openstack hypervisor list
查看网络:openstack network list
1 openstack server create --flavor ds1G --image ubuntu20-server --nic net-id=937ba92f-4f53-4da2-a1a6-6d4e1cf433bf --availability-zone nova:compute1:compute1 ubuntu1-1
–flavor:实例类型
–image:镜像
–nic:网络 net-id网络id 第4步查得
–availability-zone nova:compute1:compute1 前三步查得
查看各计算节点的虚拟机
nova list –host controller –all-tenants
nova list –host compute1 –all-tenants
2.6 修改虚拟机网络配置 创建实例后,可以分配浮动IP ,从而可以从外部直接操作虚拟机。
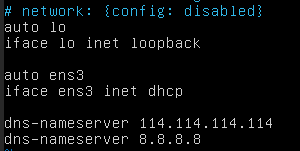
2.6.1 ubuntu20 默认使用netplan管理网络配置,修改/etc/netplan/****.yaml,修改网卡名称,设置DHCP并添加DNS,否则无法通过域名访问外部网络。
1 2 3 4 5 6 7 8 9 10 11 12 13 14 15 vim /etc/netplan/****.yaml network: ethernets: ens3: dhcp4: true nameservers: addresses: [114.114.114.114,8.8.8.8] version: 2 sudo netplan apply
2.6.2 ubuntu16
在/etc/network/interfaces.d/***.cfg中添加DNS服务器,添加dns-nameserver 114.114.114.114
生效:sudo /etc/init.d/networking restart,sudo /etc/init.d/resolvconf restart
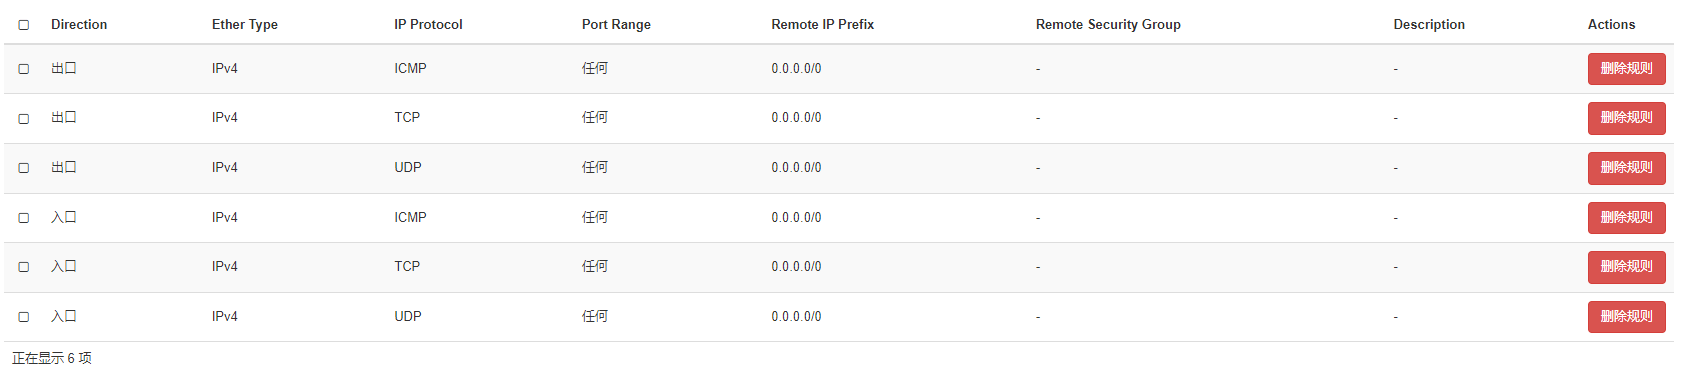
2.7 修改网络安全组规则 默认安全组规则不允许从外部进行SSH操作与ping操作,因此需要开启22端口与ICMP规则,可以直接将ICMP、TCP、UDP的所有端口的出入口规则打开。
三、DevStack相关组件 devstack相关组件均通过systemctl进行控制,其日志信息通过journalctl查看。
c-*是cinder,g-*是glance,n-*是nova,o-*是octavia,q-*是neutron。
1 2 3 4 5 6 7 8 9 10 11 12 13 14 15 16 17 18 19 20 21 22 23 /etc/systemd/system/ | grep devstack | awk ‘{print $9 }’ 输出: devstack@c-api.service devstack@c-sch.service devstack@c-vol.service devstack@dstat.service devstack@etcd.service devstack@g-api.service devstack@keystone.service devstack@n-api-meta.service devstack@n-api.service devstack@n-cond-cell1.service devstack@n-cpu.service devstack@n-novnc-cell1.service devstack@n-sch.service devstack@n-super-cond.service devstack@placement-api.service devstack@q-agt.service devstack@q-dhcp.service devstack@q-l3.service devstack@q-meta.service devstack@q-svc.service
四、可能遇到的问题 1. Host is not mapped to any cell 在控制节点执行nova-manage cell_v2 discover_hosts --verbose
1 2 3 4 5 6 7 8 9 stack@controller:~$ nova-manage cell_v2 discover_hosts --verbose Found 2 cell mappings. Skipping cell0 since it does not contain hosts. Getting computes from cell 'cell1' : 9b2d95a4-22da-4af4-8313-66f4d2f74680 Checking host mapping for compute host 'h3c-node01' : b1cc044a-841b-41fa-bbe0-ad07045ff46d Creating host mapping for compute host 'h3c-node01' : b1cc044a-841b-41fa-bbe0-ad07045ff46d Checking host mapping for compute host 'h3c-node02' : c4894695-8adf-4243-bc7f-9c950c6f9491 Creating host mapping for compute host 'h3c-node02' : c4894695-8adf-4243-bc7f-9c950c6f9491 Found 2 unmapped computes in cell: 9b2d95a4-22da-4af4-8313-66f4d2f74680
2. 创建实例超时 [错误: Build of instance 6ec6e8b1-9300-4be4-95fe-20434ea041f5 aborted: Volume e3dcad3d-dd22-4947-99d8-b8d0ad4b1025 did not finish being created even after we waited 187 seconds or 61 attempts. And its status is error.]
修改nove.conf中的重复尝试次数。参考[2.3.1 nove.conf](#2.3.1 nova.conf)。
3. 执行指令有warning 1 2 3 4 /usr/lib/python3/dist-packages/secretstorage/dhcrypto.py:15: CryptographyDeprecationWarning: int_from_bytes is deprecated, use int.from_bytes instead from cryptography.utils import int_from_bytes /usr/lib/python3/dist-packages/secretstorage/util.py:19: CryptographyDeprecationWarning: int_from_bytes is deprecated, use int.from_bytes instead from cryptography.utils import int_from_bytes
将cryptography版本降至3.4以下,pip install cryptography==3.3.2
4. 无法在compute节点使用控制台 1 2 3 4 Error response Error code: 404 Message: File not found. Error code explanation: HTTPStatus.NOT_FOUND - Nothing matches the given URI.
方法1:将local.conf的NOVNCPROXY_URL="http://$SERVICE_HOST:6080/vnc_auto.html"改为NOVNCPROXY_URL="http://$SERVICE_HOST:6080/vnc_lite.html",但是需要重装该节点的openstack
方法2:将controller节点的vnc_lite.html复制为vnc_auto.html,==推荐==
1 root@controller:/opt/stack/noVNC
方法3:修改nova的配置文件,==该方法未验证==
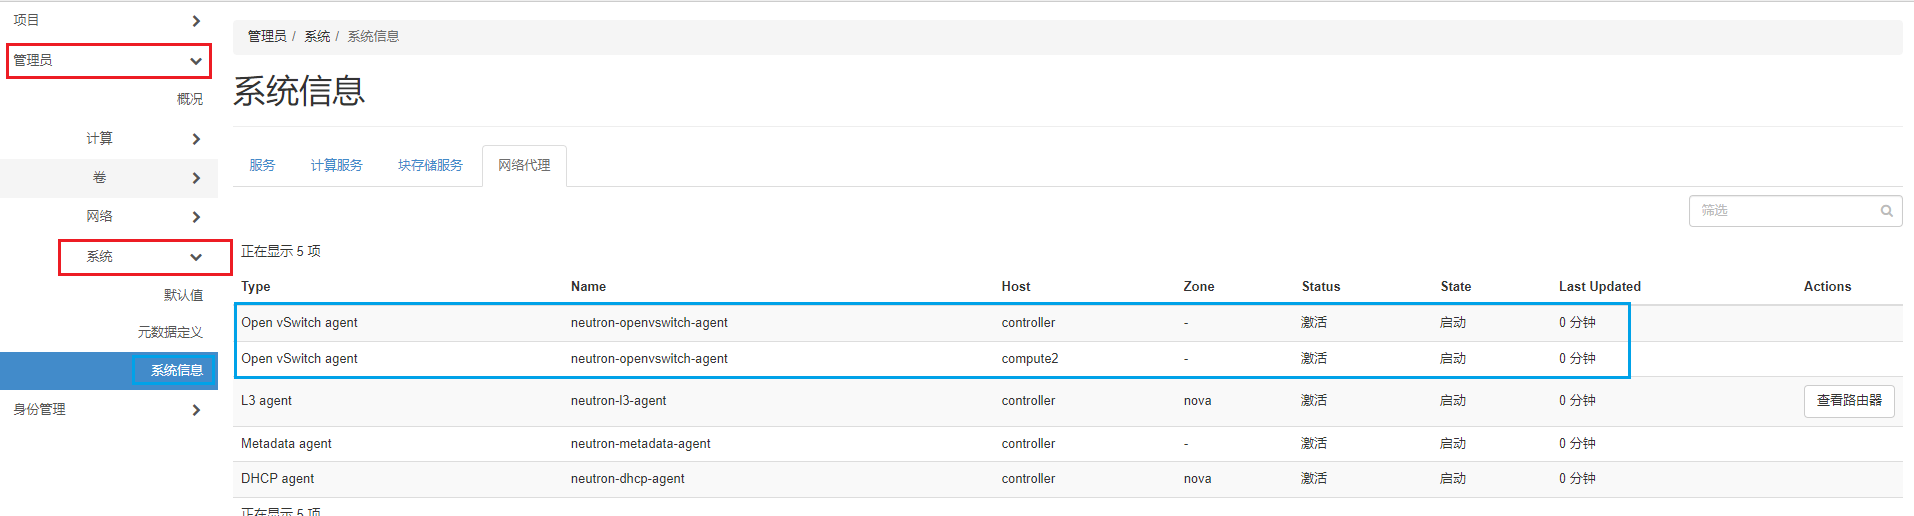
5. 创建实例时报错,PortBindingFailed 1 PortBindingFailed: Binding failed for port 57ae0adc-89f9-41c6-afa7-cef5c19c6276, please check neutron logs for more information
在DashBoard的【管理员】-【系统】-【系统信息】-【网络代理】中发现对应的compute节点没有Open vSwitch agent,需要在local.conf中修改ENABLED_SERVICES参数,添加q-agt以启用该服务。需重新部署 该节点的openstack。
6. dpkg: error processing package rabbitmq-server 1 2 3 4 5 6 7 8 9 10 11 12 13 14 15 16 17 18 19 20 21 22 23 24 Setting up rabbitmq-server (3.8.2-0ubuntu1.3) ... Job for rabbitmq-server.service failed because the control process exited with error code. See "systemctl status rabbitmq-server.service" and "journalctl -xe" for details. invoke-rc.d: initscript rabbitmq-server, action "start" failed. ● rabbitmq-server.service - RabbitMQ Messaging Server Loaded: loaded (/lib/systemd/system/rabbitmq-server.service; enabled; vendor preset: enabled) Active: activating (auto-restart) (Result: exit-code) since Wed 2022-03-09 12:18:24 CST; 13ms ago Process: 275639 ExecStart=/usr/sbin/rabbitmq-server (code=exited, status=1/FAILURE) Main PID: 275639 (code=exited, status=1/FAILURE) dpkg: error processing package rabbitmq-server (--configure): installed rabbitmq-server package post-installation script subprocess returned error exit status 1 Errors were encountered while processing: rabbitmq-server E: Sub-process /usr/bin/dpkg returned an error code (1) **解决**: 参考:[(1条消息) dpkg: error processing package *** (--configure)解决办法](https://blog.csdn.net/qq_36561697/article/details/82224279) sudo mv /var/lib/dpkg/info/ /var/lib/dpkg/info_old/ sudo mkdir /var/lib/dpkg/info/ sudo apt-get update sudo apt-get -f install sudo mv /var/lib/dpkg/info/* /var/lib/dpkg/info_old/ sudo rm -rf /var/lib/dpkg/info sudo mv /var/lib/dpkg/info_old/ /var/lib/dpkg/info/
7. rabbitmq-server.service无法启动 1 2 3 4 5 6 7 8 9 10 11 12 13 14 15 16 17 18 19 stack@h3c-node03:~/devstack$ sudo systemctl status rabbitmq-server.service ● rabbitmq-server.service - RabbitMQ Messaging Server Loaded: loaded (/lib/systemd/system/rabbitmq-server.service; enabled; vendor preset: enabled) Active: activating (start) since Wed 2022-03-09 12:27:29 CST; 403ms ago Main PID: 287819 (rabbitmq-server) Tasks: 149 (limit : 304188) Memory: 68.4M CGroup: /system.slice/rabbitmq-server.service ├─287819 /bin/sh /usr/sbin/rabbitmq-server ├─287823 /bin/sh /usr/lib/rabbitmq/bin/rabbitmq-server ├─287914 /usr/lib/erlang/erts-10.6.4/bin/beam.smp -- -root /usr/lib/erlang -progname erl -- -home /var/lib/rabbitmq -- -pa /usr/lib/rabbitmq/lib/rabbitmq_server-3.8.2/ebin -boot start_clean -noshe> ├─287925 erl_child_setup 65536 ├─288068 inet_gethost 4 └─288069 inet_gethost 4 3月 09 12:27:29 h3c-node03 systemd[1]: Starting RabbitMQ Messaging Server... 解决: 修改`/etc/hosts`,将`127.0.0.1 hostname`加进去
8. 连接mysql提示命令行使用密码不安全 1 2 mysql: [Warning] Using a password on the command line interface can be insecure. ERROR 1698 (28000): Access denied for user 'root' @'localhost'
9. die_if_not_set 215 NET_ID 'Failure creating NET 在local.conf添加ml2的VLAN配置
1 2 3 4 Q_PLUGIN=ml2 ENABLE_TENANT_VLANS=True ML2_VLAN_RANGES=physnet1:1000:2000 重装,`./unstack.sh && ./clean.sh && ./stack.sh`,报错可多执行一次
10. The user clouds.yaml file didn’t exist. 1 2 3 4 5 6 7 8 9 10 11 12 13 14 15 16 17 18 19 20 21 22 23 24 25 26 27 28 29 30 +functions-common:write_clouds_yaml:89 /usr/bin/python3.8 /home/stack/devstack/tools/update_clouds_yaml.py --file /etc/openstack/clouds.yaml --os-cloud devstack --os-region-name RegionOne --os-auth-url http://192.168.208.138/identity --os-username demo --os-password secret --os-project-name demo The user clouds.yaml file didn't exist. +functions-common:write_clouds_yaml:100 /usr/bin/python3.8 /home/stack/devstack/tools/update_clouds_yaml.py --file /etc/openstack/clouds.yaml --os-cloud devstack-alt --os-region-name RegionOne --os-auth-url http://192.168.208.138/identity --os-username alt_demo --os-password secret --os-project-name alt_demo Traceback (most recent call last): File "/home/stack/devstack/tools/update_clouds_yaml.py", line 108, in <module> main() File "/home/stack/devstack/tools/update_clouds_yaml.py", line 104, in main update_clouds_yaml.run() File "/home/stack/devstack/tools/update_clouds_yaml.py", line 61, in run self._read_clouds() File "/home/stack/devstack/tools/update_clouds_yaml.py", line 68, in _read_clouds self._clouds = yaml.load(clouds_file) TypeError: load() missing 1 required positional argument: ' Loader' +functions-common:write_clouds_yaml:1 exit_trap +./stack.sh:exit_trap:507 local r=1 ++./stack.sh:exit_trap:508 jobs -p +./stack.sh:exit_trap:508 jobs= +./stack.sh:exit_trap:511 [[ -n ' ' ]] +./stack.sh:exit_trap:517 ' [' -f /tmp/tmp.7EzmX9aLTV ' ]' +./stack.sh:exit_trap:518 rm /tmp/tmp.7EzmX9aLTV +./stack.sh:exit_trap:522 kill_spinner +./stack.sh:kill_spinner:417 ' [' ' !' -z ' ' ' ]' +./stack.sh:exit_trap:524 [[ 1 -ne 0 ]] +./stack.sh:exit_trap:525 echo ' Error on exit ' Error on exit +./stack.sh:exit_trap:527 type -p generate-subunit +./stack.sh:exit_trap:528 generate-subunit 1646374392 324 fail +./stack.sh:exit_trap:530 [[ -z /opt/stack/logs ]] +./stack.sh:exit_trap:533 /usr/bin/python3.8 /home/stack/devstack/tools/worlddump.py -d /opt/stack/logs World dumping... see /opt/stack/logs/worlddump-2022-03-04-061836.txt for details
修改文件/home/stack/devstack/tools/update_clouds_yaml.py68行代码为self._clouds = yaml.safe_load(clouds_file)
11. 创建实例时块设备映射失败
缺少虚拟卷,创建虚拟卷
1 2 3 4 pvcreate /dev/sda 参考: [cinder-volume服务状态为down 解决方法_weixin_34104341的博客-CSDN博客](https://blog.csdn.net/weixin_34104341/article/details/92968833)
12. 创建实例超时(镜像太大时会出现) 1 2 3 4 5 6 [错误: Build of instance 6 ec6e8b1-9300 -4b e4-95f e-20434 ea041f5 aborted: Volume e3dcad3d-dd22-4947 -99 d8-b8d0ad4b1025 did not finish being created even after we waited 187 seconds or 61 attempts. And its status is error.] 注意,此时尝试次数为61 ,因此判断配置文件的重试次数60 不够,只有2 、3 次的时候并不是这个原因 [root@cinder ~]#vim /etc/nova/nova.conf block_device_allocate_retries=600 block_device_allocate_retries_interval=5 block_device_creation_timeout=600
参考 Devstack 多节点自动化部署
ubuntu18.04下使用devstack安装openstack多节点的ussuri版本
Set up a development environment via DevStack — Watcher 8.1.0.dev3 documentation (openstack.org)
[Openstack 实现技术分解 (1) 开发环境 — Devstack 部署案例详解](https://www.cnblogs.com/jmilkfan-fanguiju/p/10589838.html#:~:text=Devstack 多节点部署的本质就是使用不同的 localrc 配置文件%2C 在不同的节点上运行 Devstack,部署脚本. 但需要注意的是%2C Openstack 多节点部署不仅是将不同的项目部署到不同的节点之上%2C 我们更应理解为是将 Openstack 项目中的不同服务部署到不同的节点之上.)
使用devstack/pike部署多节点实验
cinder-volume服务状态为down
每天5分钟玩转OpenStack - CloudMan